How to Take Screenshots on Chromebook – Snap a Photo
Advertisement
Introduction
The Chromebook is a strange device. It isn’t quite like the other laptops that we’ve grown to know and love, like the Mac and PC. However, that doesn’t stop many people from still purchasing and using this specific laptop.
These can range to a bunch of different reasons. Maybe someone needs a Chromebook for their business work. Or, someone might be a student in college and this was the preferred laptop of choice to use for their courses. Whatever the reason, the Chromebook has solidified itself as one of the best ways for browsing the internet, accessing applications, and many other tools that are necessary for this generation.
But, there is still one thing that may perplex a few people. What we are referring to is: the ability to take a screenshot. All laptops can do this, but there is a completely different method related to the Chromebook when doing this.
Uses of Screenshots
First of all, let’s go over the different applications of screenshots. There are many different ways that people can benefit from the uses of taking of a screen.
For one, if there is an error message or a problem that happens with something on your screen. You will be able to capture this moment and share it with whoever supervises this specific problem.
On the other hand, if you want to express how something on your screen looks to a friend, like with your game. Take a quick screenshot and let them know exactly what is going on with your side of the game. And, there are still many other functions that are associated with the simple process of taking a picture of your laptop screen.
There will always be a reason to take a screenshot, so don’t miss your chance to learn how to partake in this process.
Why You need to Know?
Well…Chromebook can be a little confusing for those people who aren’t exactly familiar with all of the different controls and functions of the laptop. Especially considering that the Chromebook keyboard is different from the traditional ones you would see on another type of laptop, like Mac or PCs.
For example, some of the keys that would be present on the latter mentioned, would be completely missing on a Chromebook. How is this even possible!? So, how would you operate the same functions on a Chromebook? Does that make the Chromebook any less competent than these other laptops?
Of course not! There is a specific way to learn how to take a screenshot on a Chromebook. Not only this, but also the many other functions that other laptops have as basic key inputs. Basically, a Chromebook will require specific key combinations in order to enact these different functions and abilities. It’s just about learning and becoming familiar with all of these different combinations for yourself.
How to Take a Screenshot on a Chromebook
Now that you know the process to operate different functions, let’s go over how to take a screenshot on a Chromebook. Which, we should add, is actually easier than most would expect…
- First the way to take a screenshot of your entire screen would be to press the following keys simultaneously: Ctrl + Show Windows. The Show Windows key is the rectangle symbol with two vertical lines. This can be located on the top row of all your keys on the keyboard, right in the middle. Similar to where the f5 would be located on a traditional PC keyboard.
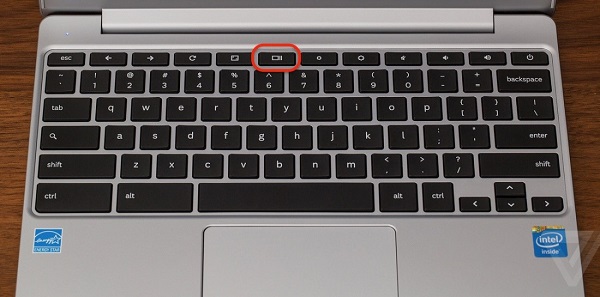
- However, if you only want to take a screenshot of a portion of your screen, this will require a few different keys. Instead, you will select the Shift + Ctrl + Show Windows This will have a crosshair icon displayed onto your screen. From this point you can select and drag the crosshair until you are covering the entire portion that you want to be highlighted as a screenshot. Just let go and the picture will be taken for you.
- As displayed below, one the screen has been taken, you will have a copy displayed onto your screen. From here, you can choose to copy the screenshot to your clipboard or annotating the image.
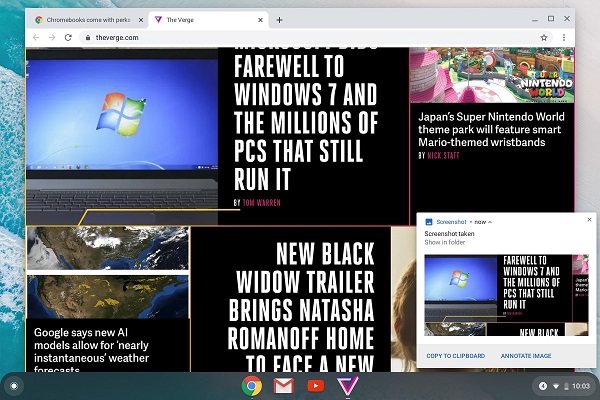
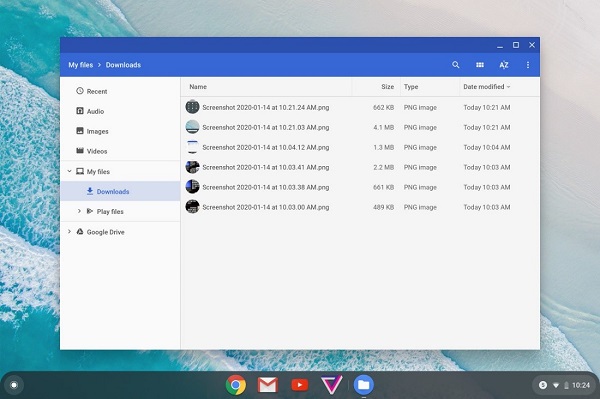
All of your screenshots will be taken to your Downloads folder. So, you can choose what to do with them afterwards.
In order to access the folder, you will need to do the following:
- Select onto the Launcher, which can be found on the left corner of your Chromebook Display.
- Then, you will need to look for an icon that is labeled at “Files”. You can easily locate this through your search bar. If you don’t originally find the folder, then select on the up arrow and continue to scroll around until you find it.
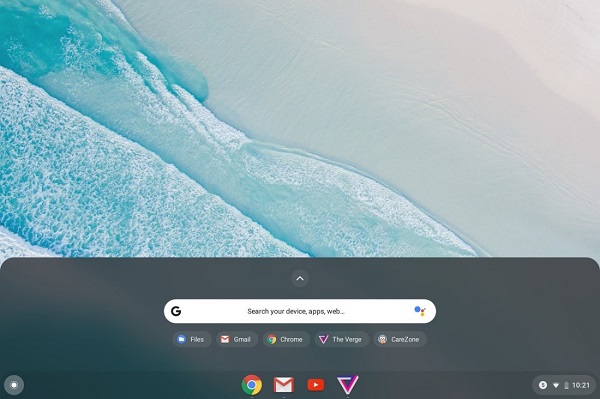
- Once you have found the folder, select on it. Doing so will open up your entire file manager. Here, you will be able to look for your Downloads folder. To make it easier, you should be able to find it under the “My Files” category, which should also be on the left side. Finally, you can find all of your beautiful screenshots in this folder.
Conclusion
And that’s it! This is everything that you need to know concerning taking a screenshot on your Chromebook. The process wasn’t so hard, right? Originally, most people would feel intimidated by the amount of effort required to take a screenshot on their laptop. But, once you’ve applied this process the first, every other time is a breeze.
Now, you can take screenshots for multiple purposes that suit your own personal needs. Again there are dozens of different reasons to take a screenshot on your laptop. And now, there is nothing stopping you from being able to do this for yourself.
Go ahead and enjoy. Star taking your screenshots now!
Advertisement
Advertisement
- Sort by best
- Top rated
- Newest


