How to Add Signature in Outlook – How to Guide
Advertisement
Your Email is Personal
In the past, before social media and text messaging, emails were the main source of online communication. If you wanted to send a message to someone, whether personal or professional, email was the way to go. If there was a serious message that needed to be directed to your boss, you would send an urgent mail. On the other hand, if you liked someone and wanted to connect with them virtually, then you could use the same method.
As a whole, email was one of, if not the first wave of online communication. Even to this day, email is still the largest method of online communication. Even though social media has seen a huge wave of modernization, not everyone likes using it. So, email will forever remain the definitive way to communicate with other individuals via the internet.
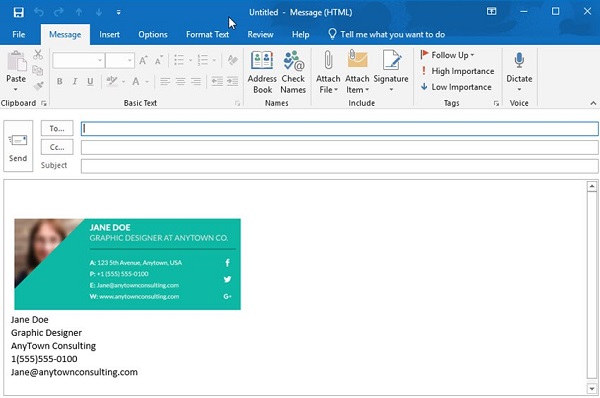
On that note, it was beneficial for you to have your own personal insignia or signature to differentiate yourself. Likewise, if you owned an email, this was an alternative to having a business card. This way, everyone who received your messages would know your business and contact information.
Benefits of an Email Signature
There are many benefits to adding a signature to your email. Whether you are a regular everyman (or woman), or a professional SEO or business associate, there are uses for signatures. Let’s go over why do you need an email signature.
For one, a signature is a surefire method to get your contact and business information across to another. For example, if you are a business owner and would like for other to receive your business card. On one hand, a lot of people would rather not carry many business cards to clutter their wallet or inventory. On the other hand, you may not be in direct contact with the people you wish to send your information. Thus, a signature can be used to link all of your professional information and contacts.
Another reason would be to personalize your own messages. Like, if you frequently use email, and want to differentiate yourself from other spam. Anyone who sees your signature will at least understand that you aren’t some random bot trying to send spam over to them. Likewise, you can add some funny or creative signatures to get a smile out of your recipients.
There are many other situations in which a signature would be appropriate. And with all of them just waiting to be discovered, what’s stopping you from using one on your Outlook? Well, nothing, now that we have this guide to explain how to add signature in Outlook emails. We’ve listed the steps necessary in the next section of the article. Continue reading if you want to learn exactly how this is done.
How to Add Signature in Outlook Emails
Luckily, you will be able to create more than just one personalized signature for your own emails and messages. Furthermore, you will be able to add a plethora of content to these, including text, a personal signature, images, a logo, and your electronic business card. Additionally, you will also be able to set up your Outlook account so that your signature will automatically be attached to your email messages.
Without further ado, here is the method to add a signature to Outlook emails…
- First, you will need to open up a new email message. Don’t worry, you won’t necessarily need to send it to anyone. Creating a draft email will suffice as good enough.
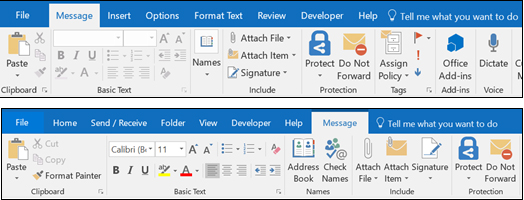
- Next, go towards the Message Here, you can select Signature and then onto Signatures.
Note: Depending on the actual size of your window, alongside whether this is a new email or a reply / forward message, the menu may differ. This isn’t a problem, as both the Message and Signature menus will still be easy to locate in this instance.
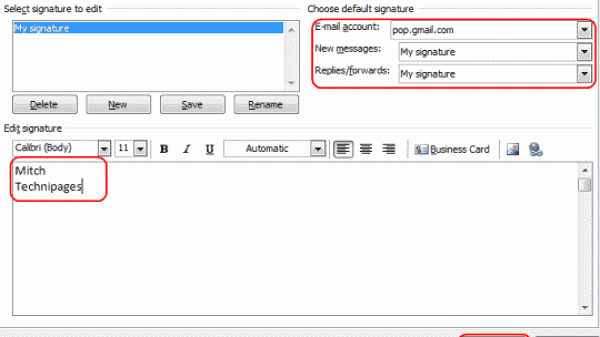
- After you’ve figured out these first two steps, head over to Select signature to edit. Under here, select the option labeled New, followed by typing the name of your signature in the New Signature
- Now, you’ll need to go under the Edit Signature Under here, you will be able to compose your entire signature the way you want. There are a ton of different editing options, such as fonts, colors, alignments, and sizes. In addition, you can also add various bullets, tables, borders, and many other types of formats. We recommend using Microsoft Word to customize and create your own personal layout, then copy and paste your results into the Edit Signature box.
On another note, you could also use one of the various pre-designed templates available to create a basic signature for yourself. These can be downloaded in Word and then copy and pasted into the Edit Signature box accordingly.
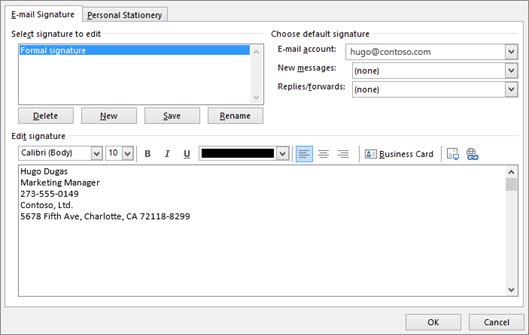
- You can add various links onto your own signature, then change the fonts and colors using the mini formatting tool.
- Also, you can add all of your relevant social media icons and links or create a custom one by using pre-designed templates.
- Images can also be added into your signature at any time.
- You can set different options to your signature under the Choose default signature Here you can select from the following:
- Under the drop-down box, E-mail account, you can choose and email account that you wish to associate with the current signature you created. This way, you can have multiple signatures for different emails.
- On the other hand, you can also choose one signature to be used to all of your new messages by default. Do this by going to the New messages drop-down box. Select one of your signatures. However, if you don’t want a signature to be automatically linked to your messages, you can select (none) as your option.
- Finally, you can also have your signature linked to replies and forwards. Do this by going to the drop-down box labeled Replies/forwards. Then select the signature you want to use. Otherwise, you can select (none) as your default.
- Once you are finished, you can select OK. This will save your signature and have you return to your original message. Outlook will not automatically add this signature to your original message used in the first step. Instead, you will need to manually add your signature for the first time, in order to have it set as default. To do this, go to Signature under the Message And then, simply select the signature you have just created.
Conclusion
And that’s everything you’ll need to know for now regarding how to add signature in Outlook email accounts. We hope you enjoy all of the different options and various applications that can be used with these signatures. Remember, emails have been around for decades, and they will continue to be around. So, always make sure to keep your own custom and personalized to have yourself stand out!
Advertisement
Advertisement
- Sort by best
- Top rated
- Newest


